Tutorial
- What Is Capsula?
- About This Tutorial
- Main Concepts
- Installation
- Working With Capsules
- Implementing Behavior
- Protected Data
- Building User Interfaces
- Asynchronous RPC Communication
What Is Capsula?
Capsula library lets you build JavaScript applications using highly reusable, flexible, and encapsulated software components called “capsules”. Capsula helps you develop web-based applications that run in the browser and server-side Node.js applications. You can even build cross-platform desktop applications using Capsula on top of NW.js, Electron, or similar platform.
With Capsula you can:
- create your application out of encapsulated components - capsules.
- have multi-level architectural views of your application which helps handle complexity better.
- easily implement complex lifecycles using state machines.
- build user interfaces flexibly by leveraging quite a unique way of managing layout.
- handle asynchronous communication focusing only on what’s essential.
- be both declarative and imperative having the best of both worlds.
- exploit really fast dev cycle of plain JavaScript; no transpiling in the process.
- expect even more, according to our goals.
Capsula is a sort of dynamic, object-oriented “language” that accommodates many new and concepts designed to handle complexity and favor abstraction, encapsulation, flexibility, and reuse. It is especially suitable for applications that exploit composite design pattern, i.e. for applications that could be built by recursively composing encapsulated modules into larger modules all the way up to the whole application.
Capsula provides state machines as mechanism for handling complex lifecycles, i.e. objects that have many different states and move from one to another during their lifetime.
Capsula also addresses communication based on the client-server (request-response) paradigm. It provides for decoupling clients from technical details of communication and enables programmers to deal with essential matters only, as well as to easily mock server-side part of communication.
Capsula is quite suitable for building user interfaces since they are usually built by using composition. Capsula provides both for templates and object-oriented way of widget manipulation. By default, Capsula supports building web UIs (relies on the DOM API), however this can be changed by extending it to work with any other JavaScript widget API, both client- or server-side.
Applications built with Capsula are neatly structured, ease to manage, and with clearly visible multi-level architecture.
About This Tutorial
The purpose of this tutorial is to smoothly tune you in on the Capsula development.
You can simply read the tutorial from the beginning till the end and you will get yourself familiar with Capsula library. There is no need to immediately follow links to external resources, however the links are there to help you extend your knowledge and to direct you to the most important points in the API reference.
Important sentences of this tutorial are presented like this:
This is very important to note.
When a module is introduced, you will see the table that directs you to the API reference and looks like this:
| [module] MyModule | |
|---|---|
| Description | Module description goes here. |
When a class is introduced we use:
| [class] MyClass | |
|---|---|
| Description | Class description goes here. |
| Module | MyModule |
For methods we follow a similar style:
| [method] myMethod | |
|---|---|
| Description | Method description goes here. |
| Class or Module | MyClass |
Please let us know of any issue you run into while reading the tutorial. We would be more than happy to improve the tutorial according to that and help you overcome the problems.
Main Concepts
This section explains the main concepts behind Capsula library as well as specifics of Capsula’s encapsulation model.
Introducing Capsules
The base concept of Capsula library is the concept of Capsule. Capsules encapsulate pieces of application logic. Capsules are usually built out of other (child) capsules. Hence, capsules form a hierarchy which serves as a backbone (or architecture) of your application.
Capsule class is a simple OO class with special features / properties. Capsules support single inheritance model and polymorphism the way OO classes do. At the same time they are dynamic the way JavaScript language is. They employ rather novel encapsulation model that relies on the above-mentioned hierarchy of capsules.
| [class] Capsule | |
|---|---|
| Description | Root class in the hierarchy of capsule classes. Every capsule class implicitly extends Capsule. |
| Module | Capsula |
There are multiple types of capsule’s properties: methods, operations, parts, hooks, loops, and data. Access to capsule’s properties is always checked by the encapsulation model as you will see.
Method is (as anyone would imagine) a simple JavaScript method. Operation acts like a method, however it is more powerful. Operations add support for asynchronous calls, declarative wiring to other operations and methods (to specify propagation of calls), and more. Part of a capsule represents its child capsule, that is, a capsule instantiated in its context (i.e. in its constructor or method). Hooks and loops provide capsules with a special support for managing widgets and layout in a flexible way. In accordance with the principle of information hiding, capsules are also able to store protected data. Finally, state machines support of Capsula library helps managing lifecycle of a capsule or any other JavaScript object.
In the following section we define access rules to the above-mentioned properties i.e. how our encapsulation model works.
Encapsulation Model
In a typical OO encapsulation model accessing fields and methods depends solely on their visibility (public, protected, private, etc.). All public fields and methods of all living objects are accessible from anywhere in the code, only a reference to an object is needed. Since everything public is accessible, we still have to carefully manage references to avoid our code becoming “spaghetti”. In many cases this encapsulation policy seems not efficient enough.
Capsula proposes stricter policy. The policy relies on both visibility of capsule’s properties and on the runtime relationship of capsule instances. Capsula neither supports packages nor the private visibility. Capsula supports two types of visibility: public and protected in the following way:
The code executing capsule’s method or constructor is only allowed to use, access, or call a) public properties of its direct child capsules (i.e. parts) and b) public and protected properties of the capsule itself.
In other words, you can only access what’s in your current context. We will use the phrase current context many times throughout this tutorial. So let’s define it:
The current context is defined as a capsule instance who owns method or constructor currently being executed (deepest in the call stack).
In single-threaded environments there is always a single current context. It is either a capsule instance whose method or constructor is currently being executed or the so called “main” context (sometimes referred to as the top-level context). Obviously, the current context changes many times as the execution goes from one method or constructor to another.
When accessing capsule’s properties, the current context is always checked and compared to the capsule that owns the property being accessed.
“Out of context” error is thrown when trying to access capsule’s properties against the rules, suggesting that the current context is not the one from which the access to the property is allowed.
Let’s elaborate on that using a figure given bellow. Figure shows three nested capsule instances: the outer, the middle (being part of the outer capsule), and the inner (being part of the middle capsule). Each of them has two properties (one public (+) and one protected (#)) that can be anything from operations, methods, hooks, loops, or data. Now let’s see what’s accessible from where.
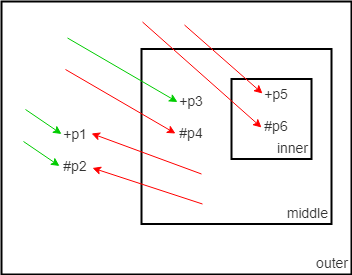
From the context of the outer capsule we are allowed to access property p3 of the middle capsule (green arrow) since it’s public and belongs to its part (i.e. belongs to a capsule instantiated in its context). However, we are disallowed to access the middle’s p4 property (red arrow) since it’s protected. From the same context of the outer capsule, we freely access properties p1 and p2 since they belong to the outer capsule itself (so it doesn’t really matter whether they are public or protected). Then, from the same context, we are disallowed to access any property of the inner capsule (either p5 or p6), since by doing that we are actually breaking encapsulation of the middle capsule. Finally, if in the context of the middle capsule we can access neither property p1 nor p2 since we are not allowed to “look” outside.
On the other hand, the typical encapsulation policy wouldn’t mind about context and runtime relationship of the three capsules (i.e. the hierarchy they form). The policy would allow access to p1, p3, and p5 from anywhere in the code since they are public. The access to protected properties (p2, p4, and p6) would depend on relationship of packages to which classes of the three capsule instances belong. This is why the arrows are orange, meaning “it depends” (see figure bellow).

To sum up, the Capsula’s policy depends on visibility of properties and runtime hierarchy of capsules. On the other hand, the typical encapsulation policy depends of visibility of properties and design-time relationship of packages. We argue that Capsula’s policy is much more efficient in enforcing order in your code.
It’s essential to understand the encapsulation model since it interweaves with everything you do in Capsula. Now that we’ve covered it, we can go straight to the coding and explain all other concepts along the way.
Installation
Capsula library is executable both within the browser and Node.js. At this point it comprises the following modules:
- capsula,
- services,
- html, and
- sm.
| [module] capsula | |
|---|---|
| Description | The core module of Capsula library. |
| [module] services | |
|---|---|
| Description | Optimizes communication based on request-response paradigm between clients and server. |
| [module] html | |
|---|---|
| Description | Enables and eases building web pages using capsules. |
| [module] sm | |
|---|---|
| Description | Provides support for implementing complex lifecycles using state machines. |
In the following lines we explain how to install Capsula in both of the two environments.
Node.js
Install Capsula using npm:
npm i @solsoftware/capsula
Require Capsula modules:
var capsula = require('@solsoftware/capsula');
var services = require('@solsoftware/capsula/dist/services');
var sm = require('@solsoftware/capsula/dist/sm');
var html = require('@solsoftware/capsula/dist/html');
Have in mind that html module depends on the DOM API which is not available in Node.js. To obtain full-blown DOM API in your Node.js environment, we suggest checking out NW.js or Electron platforms. In that case you would be able to use all Capsula modules, including html. If on the other hand your needs would be satisfied with emulated (headless) DOM, it may be that the jsdom is the right choice for you; in that case execute the following code before you start using things from the html module:
var jsdom = require('jsdom');
var window = new jsdom.JSDOM('...HTML code goes here...').window;
html.setWindow(window); // providing the window object to the html module
RequireJS
To require modules using RequireJS try:
require(['capsula'], function (capsula) {
    ...
});
require(['html'], function (html) {
    ...
});
require(['services'], function (services) {
    ...
});
require(['sm'], function (sm) {
    ...
});
or all in one:
requirejs(['services','capsula','html','sm'], function (services, capsula, html, sm) {
    ...
});
Plain old script tag
To start in a rather trivial way just take the following lines and put them into your web page:
<script src="yourPathToCapsula/services.js"></script>
<script src="yourPathToCapsula/capsula.js"></script>
<script src="yourPathToCapsula/html.js"></script>
<script src="yourPathToCapsula/sm.js"></script>
Hello World
Assuming you have successfully installed Capsula let’s try the following “Hello world” example:
var HelloWorld = capsula.defCapsule({ // new capsule class
    init: function(){ // init: keyword for constructor
        console.log('Hello World!');
    }
});
var example = new HelloWorld(); // new capsule instance, console: Hello world!
In all the code used throughout this tutorial, we use references capsula, services, html, and sm to refer to root (exported) objects of capsula, services, html, and sm modules, respectively.
Working With Capsules
Once we have everything set up, we can start coding things. Let’s try to cut into building a messaging application that delivers messages and archives successfully delivered ones.
Creating Capsule Class
Let’s start with creating our application capsule:
var Application = capsula.defCapsule({}); // {} is the capsule definition object
| [static method] defCapsule | |
|---|---|
| Description | Creates and returns a capsule constructor function based on the given capsule (class) definition object. |
| Module | Capsula |
Instantiating Capsules
To instantiate capsule use the new operator and function returned from the call to defCapsule:
var application = new Application();
Parts
Now, let’s extend our application with message archiving module. First, we create a capsule (class) for message archive:
var MessageArchive = capsula.defCapsule({});
and then we rewrite the application capsule and instantiate it:
var Application = capsula.defCapsule({
    archive: MessageArchive
});

var app = new Application(); // creates both the application and the archive instance
Here, the message archive instance is part of the application instance. The latter is therefore the owner of the former.
Constructor And Arguments
Now, let’s rewrite the MessageArchive capsule (class) to add constructor that sets flag for using encryption in the archiving process.
var MessageArchive = capsula.defCapsule({
    init: function(useEncryption){ // init is the keyword for constructor
        this.useEncryption = useEncryption;
    }
});
Use
initkeyword in the capsule definition object to specify constructor function.
Now, since the MessageArchive requires an argument during construction, the Application capsule should follow with:
var Application = capsula.defCapsule({
    archive: {
        capsule: MessageArchive, // capsule: the keyword to use to specify type
        args: true
    }
});
Here, the second form of part declaration is given. A form where part is declared using object with two properties: capsule and args.
To specify part’s type use the
capsulekeyword.
Here, instead of just specifying archive’s type, we also specify the arguments using the args keyword.
To specify arguments use
argsorargumentskeywords interchangeably. Arguments can either be specified as a single value or as an array of values in cases when part’s constructor requires multiple arguments.
In addition to declarative way, parts could be created in an imperative way as well:
var Application = capsula.defCapsule({
    init: function(){
        this.archive = new MessageArchive(true);
    }
});
Here we underline that the archive becomes part of the app capsule not because of placing it into this.archive, but because of the fact that it has been instantiated in the context of the app capsule.
At this point, every application would have an archive module using encryption. Let’s make that configurable:
var Application = capsula.defCapsule({
    archive: {
        capsule: MessageArchive,
        args: 'this.args' // 'this.args' refers to Application arguments
    }
});
Use
'this.args'string (keyword) to tell that arguments of the owner capsule should be used as well to instantiate the part capsule. Similarly, use'this'string (keyword) to tell that the owner capsule itself should be used to instantiate the part capsule.
Now the Application capsule could be instantiated like this:
var app = new Application(true); // the true value gets forwarded to the archive part
Finally, part’s arguments can be computed at the instantiation point in time by executing function:
var Application = capsula.defCapsule({
    init: function(name, useEncryption){
        this.name = name;
    },
    archive: {
        capsule: MessageArchive,
        deferredArgs: function(name, useEncryption){ // keyword: deferredArgs
            return useEncryption; // or return array for more arguments
        }
    }
});
Use
deferredArgskeyword to specify function that gets called just before part’s instantiation to return arguments for part’s instantiation. The function would be called with the same arguments as the ones used to instantiate the owner capsule. The function should return either a single value or an array of values in cases when part’s constructor requires multiple arguments. Referencethisinside the function points to the owner capsule instance.
Now, this:
var app = new Application('My application', true);
would create inner archive that uses encryption.
When it comes to ordering of execution, parts get instantiated before the owner’s constructor (
init) is called.
Inheritance
As expected, Capsule class may extend another capsule class. Single-inheritance model is supported.
var MongoDbMessageArchive = capsula.defCapsule({
    base: MessageArchive
});
The sub-capsule inherits all the properties and methods of the super capsule.
Sub-capsule may decide to call the super-type’s constructor from within its own constructor:
var MongoDbMessageArchive = capsula.defCapsule({
    base: MessageArchive,
    init: function(useEncryption, port){
        this.superior().init.call(this, useEncryption); // calls the super constructor
        this.port = port;
    }
});
Super-type’s constructor doesn’t get called implicitly, so if you need it, make sure you call it explicitly (as shown above).
| [method] superior | |
|---|---|
| Description | Returns the super prototype object to enable calls to methods of the super capsule. |
| Class | Capsule |
It is also possible to create an abstract capsule:
var Archive = capsula.defCapsule({
    isAbstract: true // isAbstract is the keyword for designating abstract capsules
});

var archive = new Archive(); // Error: Abstract capsules cannot be instantiated
Abstract capsules that cannot be instantiated.
So far we have covered the very basic stuff. Let’s continue and add a bit of dynamic with methods and operations.
Destroying Capsules
When capsule instance is no longer needed you need to do two things to have it garbage collected: a) call the detach method on it and b) dereference the capsule, i.e. destroy (null) all the references that point to it.
Calling the detach method on a capsule is necessary in order to null the reference between its owner capsule and it; a reference which is invisible to you and which is implicitly maintained by the Capsula library. This implicit reference is used internally to perform context checks, i.e. checks that enforce our encapsulation model. So, this is where we pay for the benefits of strict encapsulation.
Also, when detaching a capsule, its protected method onDetach would be called if implemented (a chance to release resources). The same method would be called recursively on all its descendant capsules as well.
| [method] detach | |
|---|---|
| Description | Detaches this capsule as a part of the capsule that represents the current context of execution. Destroys an implicit reference between the two capsules. |
| Class | Capsule |
Implementing Behavior
Dynamic parts of your application are implemented using methods, operations, and state machines. Let’s start with methods, being a concept you already know very well.
Methods
Let’s create a MessageArchive capsule with a couple of methods:
var MessageArchive = capsula.defCapsule({
    init: function(useEncryption){
        this.useEncryption = useEncryption;
    },
    persist: function(message){
        // TODO persist the message
        console.log('persisted ' + JSON.stringify(message));
    },
    encrypt: function(message){
        // TODO encrypt the message
        console.log('encrypted ' + JSON.stringify(message));
        return message; // encrypted message
    },
    '+ process': function(message){
        message.archivingTime = new Date();
        if (this.useEncryption)
            message = this.encrypt(message);
        this.persist(message);
    }
});
Protected are the persist and the encrypt methods, while the process method is public.
Public methods should have a + sign prefix to distinguish them from protected ones.
Now, to archive some messages try the following:
var encryptionArchive = new MessageArchive(true); // encryption
encryptionArchive.process({body: 'Hello World!'}); // console: encrypted + persisted

var archive = new MessageArchive(false); // no encryption
archive.process({body: 'Hello World!'}); // console: persisted
Great, it works. If however we try:
archive.encrypt({body: 'Hello World!'}); // Error: Out of context...
the error is raised since we are calling protected method from the outer context.
Overriding Methods
As one would expect, overriding a method from the parent capsule class in a child capsule class is supported and very simple: just create the method with the same signature as the method you are overriding. Make sure you don’t change its visibility, since that is not allowed.
Fake Methods
Now, let’s elaborate a little bit more on methods. Imagine the MessageArchive capsule with the process method declared differently (in the constructor):
var FakeMessageArchive = capsula.defCapsule({
    init: function(useEncryption){
        this.useEncryption = useEncryption;
        this.process = function(message){ // <--- fake method
            message.archivingTime = new Date();
            if (this.useEncryption)
                message = this.encrypt(message);
            this.persist(message);
        }
    },
    persist: function(message){
        // TODO persist the message
        console.log('persisted ' + JSON.stringify(message));
    },
    encrypt: function(message){
        // TODO encrypt the message
        console.log('encrypted ' + JSON.stringify(message));
        return message;
    }
});
Now let’s try to execute the following:
var archive = new FakeMessageArchive(true);
archive.process({body: 'Hello World!'});
Yes, it fails. This is because the fake process method is not treated as a regular capsule’s method and does not switch context to message archive capsule when being called. The code of this method is actually being executed in the outer context (i.e. the context from where the fake method was called) instead of from the message archive context. Being in the outer context, any attempt to access a protected property of the message archive capsule would fail with out of context error. In this case the line message = this.encrypt(message); would be the place where it fails, since this is the place where a protected property is first being used. Had no property access occurred inside the process method, it would have completed without an error.
One could ask why it didn’t fail at the if (this.useEncryption) line? Well, this is because useEncryption datum is not special property of the message archive capsule. It is a simple JavaScript property (similarly to a fake method, we could name it a fake property). It could be regarded as public property accessible from anywhere in your code. To learn how to declare datum or data as capsule’s property (having usual access protection), check Protected Data or just keep reading.
Operations
Now let’s go one step further and explain operations. They are like methods but more powerful. The following facts hold for operations and make distinction between operations and methods:
- Operations are always public.
- Operations can be bound (both declaratively and imperatively) to one another and to methods, to specify propagation of calls. Binding operations is called wiring; bindings are called wires.
- Operation can either be input or output. Input operation serves as a propagator of calls from the outside towards the inside of the capsule that owns the operation. Output operation does the opposite, it serves as a propagator of calls from the inside towards the outside of its owner capsule.
- Operations can be called both in synchronous and in asynchronous way.
- Operations can be created dynamically, in runtime.
- There are other features that are specific to operations like enabling / disabling them, filtering operations’ arguments, etc.
| [class] Input | |
|---|---|
| Description | Input operation is a specific public property of a capsule. Input operation serves as a propagator of calls from the outside towards the inside of the capsule that owns the operation. |
| Module | Capsula |
| [class] Output | |
|---|---|
| Description | Output operation is a specific public property of a capsule. Output operation serves as a propagator of calls from the inside towards the outside of its owner capsule. |
| Module | Capsula |
Let’s go back to our example. Let’s imagine our application receives messages from the outside world:
var Application = capsula.defCapsule({
    '> newMessage': 'archive.process', // > means input operation
    archive: {
        capsule: MessageArchive,
        args: 'this.args'
    }
});

var app = new Application(true);
app.newMessage({body: 'Hi!'}); // console: encrypted + persisted
Looking from the outside, the newMessage operation looks the same and is being called the same way as regular methods. From the inside however, we see that our operation has been declaratively bound (wired) to a method process of the capsule’s archive part.
Input operations are declared with > sign.
The same wiring of operations could be done imperatively using the target method:
var Application = capsula.defCapsule({
    '> newMessage': null,
    init: function(){
        this.newMessage.target(this.archive.process); // imperative way of wiring
    },
    archive: {
        capsule: MessageArchive,
        args: 'this.args'
    }
});
Moreover, we could even create the newMessage operation imperatively:
var Application = capsula.defCapsule({
    init: function(){
        this.newMessage = new capsula.Input(); // imperative creation
        this.newMessage.target(this.archive.process); // imperative wiring
    },
    archive: {
        capsule: MessageArchive,
        args: 'this.args'
    }
});
and even wire it on spot:
var Application = capsula.defCapsule({
    init: function(){
        this.newMessage = new capsula.Input(this.archive.process);
    },
    archive: {
        capsule: MessageArchive,
        args: 'this.args'
    }
});
Imperative way of creating operations is particularly useful when number of operations is unknown at design time; for example, when number of operations depends on a certain runtime value.
| [method] target | |
|---|---|
| Description | Wires this operation acting as a source in the current context of execution to the given targets (operations and methods). The method accepts both comma separated list of operations and methods and an array of operations and methods. |
| Class | Operation |
Now that we have archiving in our application, let’s add a delivery module. Let’s start by creating MessageDelivery capsule:
var MessageDelivery = capsula.defCapsule({
    '< onDelivered': null, // < means output operation
    '> process': function(message){ // wiring of input operation to a method
        // TODO delivery
        message.delivered = true;
        if (message.delivered){
            console.log('delivered ' + JSON.stringify(message));
            this.onDelivered(message);
        }
    }
});
Two things should be noted here. First:
Output operations are declared with < sign.
And second: input operation process has been wired on-spot to the protected method that handles it. You can think of this as declaration of process input operation and declaration of process protected method wired to it (handles all calls to operation).
Now that we’ve tackled this particular situation of having operation and method sharing the same name, it makes sense to explain how to override (in sub-classes) behavior of such a pair. It’s easy. Both operation and method get inherited in sub-capsule. However, only methods could be overridden, so simply write:
    ...
    process: function(message){
        // TODO
    }
    ...
and you are good to go.
Now, let’s go back to our example. Instead of declaratively, creating output operation could be achieved imperatively as well:
var MessageDelivery = capsula.defCapsule({
    init: function(){
        this.onDelivered = new capsula.Output(); // imperative creation
    },
    '> process': function(message){ // wiring of input operation to a method
        // TODO delivery
        message.delivered = true;
        if (message.delivered){
            console.log('delivered ' + JSON.stringify(message));
            this.onDelivered(message);
        }
    }
});
Output operations never really do anything themselves. Unlike input operation’s constructor, output operation’s constructor doesn’t have optional function argument, since the behavior triggered by the output operation is always unknown in the context where it gets created. Output operations only serve to propagate calls and events to the outside world. Hence, the onDelivered output operation has been declared with null value. It could have been declared with an empty-body function only to make operation’s signature visible, but in runtime the effect of doing that is the same as simply putting null value. Calling an output operation that hasn’t been wired to any other operation or method outside is a no-op.
So, our delivery module works this way: it accepts the message through the process input operation, tries to deliver it, and signals that to the outside world by calling the output operation onDelivered (in case of successful delivery). We follow the convention of naming output operations using the pattern on....
Had we wanted to short-circuit each received message immediately to the onDelivered output operation we would have done it by simply like this:
var ShortCircuitMessageDelivery = capsula.defCapsule({
    '< onDelivered': null,
    '> process': 'this.onDelivered' // wires process directly to onDelivered
});
Now that we have both archiving and delivery modules ready, our application could look like this:
var Application = capsula.defCapsule({
    '> newMessage': 'delivery.process',
    delivery: MessageDelivery,
    archive: {
        capsule: MessageArchive,
        args: 'this.args'
    },
    'delivery.onDelivered': 'archive.process' // declarative wiring
});

var app = new Application(true);
app.newMessage({body: 'Hello!'}); // console: delivered + encrypted + persisted
Please note the declarative wiring of operations in the code above. The notation is simple: for each operation, start with the name of operation’s owner capsule (which can be this as well), then add a dot, and finally end with the name of operation (or method) itself.
Implemented like this, the application tries to deliver each message, archiving only successfully delivered ones. According to the console output, the message has been both delivered and persisted.
Operations could be wired to more than one operation (and method). To demonstrate that, let’s add the onDelivered output operation to the application capsule:
var Application = capsula.defCapsule({
    '< onDelivered': null,
    '> newMessage': 'delivery.process',
    delivery: MessageDelivery,
    archive: {
        capsule: MessageArchive,
        args: 'this.args'
    },
    'delivery.onDelivered': ['archive.process', 'this.onDelivered'] // array
});
As shown in the last line of the application capsule’s body, an output operation of the delivery module has been wired to an input operation of archive module and an output operation of the application capsule itself. The same could be done imperatively:
var Application = capsula.defCapsule({
    '< onDelivered': null,
    '> newMessage': 'delivery.process',
    delivery: MessageDelivery,
    archive: {
        capsule: MessageArchive,
        args: 'this.args'
    },
    init: function(){
        this.delivery.onDelivered.target(this.archive.process, this.onDelivered);
        // or using an array:
        // this.delivery.onDelivered.target([this.archive.process, this.onDelivered]);
    }
});
In this case, we say that the this.delivery.onDelivered output operation acts as source, while the this.archive.process and the this.onDelivered act as targets.
Each source operation could be wired to many targets. Similarly, each target operation could be wired to many source operations. When being wired, a method can only act as a target.
| [method] source | |
|---|---|
| Description | Wires this operation acting as a target in the current context of execution to the given operations (sources). |
| Class | Operation |
Obviously where there is collection there is ordering as well. So, where there are multiple targets for a single source operation it may be useful to specify ordering of targets. In those cases targetAt (see API reference) method should be used.
Finally, operations get unwired or rewired as easily as they get wired. Have in mind the following methods: untarget, unsource, retarget, resource, untargetAll, and unsourceAll. Also, you can check whether wiring exist between operations (and methods) with: isSourceOf, and isTargetOf.
Operation Result
As shown above, operation calls are propagated according to the wiring. Wiring network ends where operations are wired to methods. The methods make the final combined effect of an operation call. The result of calling an operation is a combined result of all operation calls downstream. The result of calling an operation is:
a) an array of method results, if there is more than one downstream method,
b) a method result itself, if there is only one downstream method (this is by default, but can be changed to return array, see setUnpackResult),
c) undefined, if there are no downstream methods.
Asynchronous Invocation
Calling and operation the same way as calling a regular JavaScript method means synchronous call. That means control is returned to the caller once all of the downstream methods are executed. There is however an asynchronous way of calling an operation. This is done by using the operation’s send method:
app.newMessage.send({body: 'Hello!'}).then(function(result){
    // TODO processing results...
    console.log('Processing results...');
});
Call to send returns Promise object which allows for handling the results in both successful and erroneous use cases. In case of an asynchronous operation call, the control is returned to the caller immediately and propagation of calls is done in asynchronous manner at some point in future.
| [method] send | |
|---|---|
| Description | Calls this operation in an asynchronous way. Returns control immediately. Returns Promise. |
| Class | Operation |
State Machines
Capsula provides support for handling complex behavioral aspects of your system using the well-known conceptual tool: state machines. State machines are really good and powerful. They allow us to model complex behavior in a declarative way, instead of using tons of ifology which is very hard to implement and later maintain.
State machine models the lifecycle of an object, usually called the host object. During its lifecycle, the host object moves from one state to another according to transitions that connect states and events that trigger these moves. At any point in time, the state machine keeps track of the host object’s state. What’s more, by running the host object’s lifecycle the state machine orchestrates execution of pieces of host object’s behavior that reside in host object’s methods and functions of the state machine itself.
The sm module doesn’t really depend on other modules, so you can use it in isolation. It allows you to model lifecycle of any JavaScript object i.e. it’s not exclusively built for capsules.
A simple scenario of using state machines is given bellow:
// create the state machine (class, constructor)
// out of the state machine definition object
var ApplicationLifecycle = sm.defSM({
    // TODO state machine definition (explained in a moment, keep reading)
});

// take the object (in this case application)
// whose lifecycle is to be modeled by the state machine
// (it doesn't have to be a capsule)
var host = app;

// create state machine instance that handles the application (host) object
var applicationLifecycle = new ApplicationLifecycle(host);

// start the application's lifecycle
applicationLifecycle.init();

// read the application's state
console.log(applicationLifecycle.getState());

// move the lifecycle forward according to the event that happened
applicationLifecycle.process('eventName');

// read the application's state again
console.log(applicationLifecycle.getState());
So, the state machine is created using the defSM method of the sm module, according to the given state machine definition object.
| [static method] defSM | |
|---|---|
| Description | Creates and returns a state machine constructor function based on the given state machine definition object. |
| Module | sm |
In the code above, the state machine definition object is empty, because we want to stay focused on the usage scenario and not on the lifecycle details. The state machine class is represented by the ApplicationLifecycle object which is actually a constructor function. We can have as many state machine classes as we want, according to the number of lifecycle types that we recognize in our system.
In our case, the host object is the application (app) object. As already stated, the host object can be any JavaScript object whatsoever.
To handle lifecycle of the host object we instantiate state machine class with the host object as an argument; the result is the applicationLifecycle object.
Sometimes it makes sense to place the reference to lifecycle object directly into the host object so it’s always at hand (no need to track both references), for example:
host.lifecycle = applicationLifecycle;
Anyhow, the lifecycle object we use to:
- start the host object’s lifecycle (using the
initmethod), - trigger the host object’s lifecycle with events (using the
processmethod), and - read the host object’s state (using the
getStatemethod).
| [method] init | |
|---|---|
| Description | Starts the lifecycle of the host object, i.e. "pushes" the host object into the initial state of this state machine (and further from there). |
| Class | StateMachine |
| [method] process | |
|---|---|
| Description | Triggers the lifecycle of the host object according to the given event (trigger). |
| Class | StateMachine |
| [method] getState | |
|---|---|
| Description | Returns the state of the host object. |
| Class | StateMachine |
Note that instantiating state machine class with the host object as an argument allows the same host object to have multiple state machines (and multiple parallel states); this is when the host object has lifecycles in multiple semantic contexts and we want manage all of them.
States
Now that we’ve covered the basic usage scenario, let’s focus on lifecycle and create one simple state machine that explains all the supported concepts in lifecycle management.
var ApplicationLifecycle = sm.defSM({
    initial: { // initial state (keyword)
        next: { // triggerless transition; fires immediately (keyword)
            target: 'TOP.working' // target state: 'working' (keyword)
        }
    },
    working: { // composite state
        initial: {
            next: {
                target: 'TOP.working.running'
            }
        },
        running: { // simple steady state
            entry: function(){ // executed when entering this state (keyword)
                console.log('start running');
            },
            pause: { // transition, fires on 'pause' trigger i.e. event
                target: 'TOP.working.pausing', // target state: 'pausing'
                guard: function(){ // guards this transition (keyword)
                    return true; // returns true to continue unconditionally
                },
                effect: function(){ // executed along with this transition (keyword)
                    console.log('Taking a break...');
                }
            }
        },
        pausing: { // simple steady state
            resume: { // transition, fires on 'resume' trigger (event)
                target: 'TOP.working.running' // target state: 'running'
            },
            exit: function(){ // executed when leaving this state (keyword)
                console.log('Enough of pausing...');
            }
        },
        stop: { // transition, fires on 'stop' trigger (event)
            target: 'TOP.final'
        }
    },
    final: { // final state (keyword)
        entry: function(){
            console.log('application stopped');
        }
    }
});

var host = app;

host.lifecycle = new ApplicationLifecycle(host);

host.lifecycle.init(); // console: start running

console.log(host.lifecycle.getState()); // console: TOP.working.running

host.lifecycle.process('pause'); // console: Taking a break...

console.log(host.lifecycle.getState()); // console: TOP.working.pausing

host.lifecycle.process('resume'); // console: Enough of pausing... + start running

console.log(host.lifecycle.getState()); // console: TOP.working.running

host.lifecycle.process('stop'); // console: application stopped

console.log(host.lifecycle.getState()); // console: TOP.final
State machine definition object is a collection of objects that represent states.
State can either be steady or not. Steady state means the host object may reside in it for a longer period of time. If not steady, once entered the host object immediately tries to resume to another state by following the transition given in state’s next property. If no such a transition is given, or if it cannot be followed due to a guard (guards are explained later), an error is thrown.
Several types of states exist:
- simple states,
- composite states,
- initial states, and
- final states.
Simple states don’t have sub-states.
Simple states are steady by default. To make them not steady set the steady property to false and make sure you provide the next property with transition that points to another state.
Composite states comprise other states. The hierarchy of states can be arbitrarily deep.
The host object cannot reside in a composite state without residing in one of its direct or indirect steady sub-states. In that sense we say that composite state is not steady, although the host object can indirectly reside in it for a longer period of time.
The state machine definition object itself is considered to be a state (most often a composite one).
Initial state is a starting point of a lifecycle of its parent (composite) state. Initial states are designated with the initial keyword. Composite state must have an initial state in it.
Initial states are like a simple states: they must not have inner states. Initial states are never steady, i.e. they always have the next transition pointing to another state.
Final state is an ending point of a lifecycle of its parent composite state. Composite state may have zero or one final state in it.
Final state has neither inner states nor transitions. Final state is always steady.
Even though it doesn’t have transitions of its own, it does inherit transitions from its parent states, so the host object may continue its lifecycle, but not inside the final state’s context i.e. not inside its direct parent state.
A state can have an entry and / or exit action.
Entry and exit actions are designated with entry and exit properties inside the state object.
Entry action is a function that gets executed once the host object enters the state in which the entry action is declared.
Exit action is a function that gets executed once the host object leaves the state in which the exit action is declared.
Entry or exit action can either be declared using a JavaScript function (as in our example above) or using a string designating a method of the host object.
Inside entry or exit function the this reference points to the host object (application object in our example). At the same time, the single argument of entry or exit function points to the state machine object (the applicationLifecycle object in our example).
The lifecycle of our application object starts at the initial state. The running and the pausing states are both simple and steady. The working state is a composite state. Apart from the initial state, it comprises the running and pausing states. By entering the final state, our application object terminates its lifecycle.
Transitions
Transitions are moves that host object makes from the current, source state to a target, destination state. Along the way, the host object exits the source state and all its parent states up to (and excluding) the closest common owner of the source and destination states. After exiting those states, it enters all the parent states of the destination state starting from the the closest common owner of the source and destination states (excluding it) to the destination state itself.
Transitions are represented by JavaScript objects. Transition resides inside its owner state to declare possible destination state for it. They differentiate from states by having a
targetattribute which points to a destination state using its fully qualified name.
The fully qualified name starts with the TOP prefix which denotes the top (root) state of our state machine. It then continues with dot-separated list of names of all parent states (in the top-down order) and finally ends with the target state name. For example: TOP.working.pausing would be a fully qualified name for the pausing state.
Apart from the target property which is transition’s required property, there are other two (optional) properties: guard and effect.
Before making a transition, the state machine would check the guard associated to the transition (if it exists).
The guard is either a string designating the host object’s method name or a simple function. In any case, the guard should return true or false to tell the state machine to move down this transition or not.
If the guard allows for making a transition to a target state, an effect of a transition would be executed.
An effect is either a string designating the host object’s method name or a simple function.
Inside guard or effect function the this reference points to the host object. At the same time, the single argument of guard or effect function points to the state machine object.
If a transition’s guard allows for making a transition, three steps are executed in the following order:
- exit actions of all exited states (in the bottom-up order),
- the effect of the transition, and
- entry actions of all entered states (in the top-down order).
There are two types of transitions:
- regular transitions that fire explicitly on a specific event (given as an argument to the
processmethod) and - transitions that fire implicitly when their owner state is entered; let’s call them triggerless.
Regular transitions fire on event that matches their name. For example, the resume transition would fire only when the process method is called with the resume string argument. Of course, the precondition is that the host object is in the pausing state at that moment.
Sometimes it happens that parent state’s transition matches the event name as well. In those cases the transition to fire is chosen by going from the host object’s current steady state upwards the state hierarchy searching for the first transition that matches the event name. When found, it fires if its guard allows for that, otherwise the host object stays in the the same steady state.
In our state machine there are three regular transitions: pause, resume, and stop.
On the other hand, triggerless transitions try to fire immediately after the host object enters the state they reside in. Actually, immediately after execution of entry actions.
Triggerless transitions are always listed in the
nextproperty of the owner state.
The next property can have one or more triggerless transitions listed in it. JavaScript array should be used in case of multiple triggerless transitions.
A state may have multiple triggerless transitions, either directly in it or indirectly through parent states. When a state is entered, all the triggerless transitions that belong to states that just got entered are guard-tested and only the first one whose guard returns true is fired. It makes sense to ensure that exactly one guard returns true for any state at any point in time.
The concept of triggerless transitions goes beyond what’s typical for state machines. We introduce it since in some situations it proves very useful. For example, it allows us to create algorithms using the state-machine apparatus.
In our example, after calling the init method of the applicationLifecycle object the host object (application) starts from the initial state of our state machine. Since that state is not steady, the lifecycle immediately moves forward to the working state. The working state is composite so we continue from its initial state and immediately move to the TOP.working.running state executing its entry action before settling down in it. This is where the host object stays for a while and waits for the new event.
If the pause event happens (i.e. if we call process('pause')), the transition with that name is selected for firing. Before firing its guard is tested and it returns true; so the lifecycle continues to the TOP.working.pausing state executing the transitions’s effect along the way. Now, the host object settles down in the pausing state. Again, the host object waits for the new event.
If the stop event happens at this point, the host object would react since the stop event is declared for the parent (working) state which means it is relevant for all its child states (running and pausing). The guard does not exist, so we immediately move to the final state, executing the exit action of the pausing state and entry action of the final state in this order.
Contextualization
As already explained, when accessing capsule’s properties, the current context is always checked and compared to the capsule that owns the property being accessed. Once you get used to our encapsulation model this is usually fine, however in some cases you still might get surprised when out of context error pops up. Let’s reach out for an example.
Let’s discuss what would happen if the persist method of the MessageArchive capsule persisted messages asynchronously (using some data source) and then called incNumPersisted method on success to increment internal counter of successfully persisted messages:
// this mocks asynchronous persistence and returns after one second
var dataSourceMock = {};
dataSourceMock.save = function(){
    var p = new Promise(function(resolve, reject){
        setTimeout(function(){
            resolve();
        }, 1000); // one second delay
    });
    return p;
};

var MessageArchive = capsula.defCapsule({
    init: function(useEncryption){
        this.useEncryption = useEncryption;
    },
    incNumPersisted: function(){
        if (this.numPersisted != null)
            this.numPersisted++;
        else
            this.numPersisted = 1;
    },
    persist: function(message){ // asynchronous persistence
        var that = this;
        dataSourceMock.save(message).then(function (){ // callback
            that.incNumPersisted();
        });
    },
    encrypt: function(message){
        // TODO encrypt the message
        return message;
    },
    '+ process': function(message){
        message.archivingTime = new Date();
        if (this.useEncryption)
            message = this.encrypt(message);
        this.persist(message);
    }
});

var archive = new MessageArchive(true);
archive.process({body: 'Hello world!'});
Let’s try to follow the context of execution of the code above. Calls to defCapsule, new MessageArchive(true), and archive.process(...) all get executed from the top-level (main) context. The code inside the process method gets executed within the context of the archive capsule. The code inside the persist method also gets executed within the same context. This code calls the save method of the mock data source and immediately returns (because of the asynchronous nature of the save method). The process also returns and we leave the context of the archive capsule back to the top-level context. Everything settles down until the mock data source finishes its job after one second. When that happens, the callback method (see then) is called from the current context, which is at this point in time the top-level context. The callback method fails on that.incNumPersisted with the out of context error because that.incNumPersisted is protected method of the archive capsule and the callback is trying to call it from the top-level context. In other words, we didn’t switch to archive’s context while trying to execute its protected method. So, how do we handle this?
Basically, the problem occurs when capsule’s property is being accessed from the context where this is not allowed. Usually, this happens after asynchronous calls get resolved (or rejected) or a when event-handlers’ callbacks get called.
The solution lies down in the contextualize method. Use it to contextualize another method, i.e. to wrap it so it gets executed within the context from where the contextualize method is called. For example, the persist method implemented like this would fix the problem:
persist: function(message){
    var that = this;
    dataSourceMock.save(message).then(capsula.contextualize(function (){ // <---
        that.incNumPersisted();
    }));
}
The only difference is in the callback method being contextualized. It has been contextualized to the context in which the contextualize method is called. And that would be the context of the archive capsule itself.
Note that the contextualize method does not have a context parameter. It is not meant to be a silver bullet that lets you access any context you like. No; it only allows you to contextualize to the context you are in, i.e. to the context you own. In other words, you cannot break into someone else’s context just like that. You need to be there to let others in.
| [static method] contextualize | |
|---|---|
| Description | Creates and returns new contextualized function that "remembers" the context in which this function (contextualize) is called. When called, the returned function executes the function being an argument of contextualize within that "remembered" context. |
| Module | Capsula |
Error Handling
Support for error handling in capsules comes down to this. The handle method in capsule class would be called each time an error is thrown in the context of that capsule:
var Application = capsula.defCapsule({
    handle: function(err){
        console.log(err.message);
    },
    '> newMessage': function(message){
        throw new Error('failed');
    }
});

var app = new Application();
app.newMessage({body: 'Hello!'}); // console: failed
Make sure you don’t have errors popping out of the handle method, since that would produce an endless recursion.
Protected Data
Now that we’ve covered how to work with methods and operations, let’s see how to handle data in an encapsulated way, i.e. how to protect data inside capsules. Basically, the idea is to use a wrapper class that stores the data and enforces protection.
To create protected object simply do the following:
var protectedObject = new capsula.Data({name: 'Hello world!'});
The protectedObject would only allow access to the object it protects from the context that created it.
An argument of capsula.Data constructor can be just about anything, from simple values to objects and arrays. Whatever you put inside would later be available to you if you ask from the right context.
| [class] Data | |
|---|---|
| Description | Data is a specific public property of a capsule. It serves to store information and to protect them from illegal access. |
| Module | Capsula |
To get and modify protected object:
var obj = protectedObject.get();
obj.name = 'Hello protected world!';
| [method] get | |
|---|---|
| Description | Returns protected information from this data. |
| Class | Data |
To replace protected object:
protectedObject.set({name: 'Replacement'});
| [method] set | |
|---|---|
| Description | Sets protected information to this data. |
| Class | Data |
If you try to call protectedObject.get or protectedObject.set from anywhere other than capsule that created it, an Error would be thrown, since that would be an attempt of illegal access, access that breaks encapsulation.
Let’s now return to our application and make use of protected data. Let’s add message log that keeps track of all received messages.
var Application = capsula.defCapsule({
    // declaration of operations
    '< onDelivered': function(message){},
    '> newMessage': function(message){ // let's put each message to the message log
        this.messageLog.get().push(message);
    },

    // parts
    delivery: MessageDelivery,
    archive: {
        capsule: MessageArchive,
        args: 'this.args'
    },

    // wires
    'delivery.onDelivered': ['archive.process', 'this.onDelivered'],
    'this.newMessage': 'delivery.process',

    // constructor
    init: function(){
        this.messageLog = new capsula.Data([]); // creates new data out of an array
    },

    // public methods
    '+ getMessage': function(index){
        return JSON.stringify(this.messageLog.get()[index]);
    },
    '+ resetLog': function(){
        this.messageLog.set([]); // new empty array
    }
});

var app = new Application(true);
app.newMessage({body: 'The first message.'});
app.newMessage({body: 'The second message.'});

app.messageLog.get()[0]; // Error: Oops! Make sure you do this in the right context.
app.getMessage(0); // "{"body":"The first message." ...}"

app.resetLog();
In the code above, the constructor init creates the protected data, i.e. the protected message log array. The newMessage input operation is now wired both to the function that stores each received message to the message log and to the delivery.process operation. Methods getMessage and resetLog are added to return logged message based on the order of appearance and to reset the log so it doesn’t get too large, respectively.
Creating protected data could be done declaratively as well.
For example, we could replace the constructor which initializes messageLog with the following:
messageLog: '*[]'
The '*[]' is basically a keyword that means new array for every instance. All supported keywords are given here:
myObject: '*{}',        // new Object in this.myObject
myArray: '*[]',         // new Array in this.myArray
myMap: '*Map',          // new Map in this.myMap
mySet: '*Set',          // new Set in this.mySet
myWeakMap: '*WeakMap',  // new WeakMap in this.myWeakMap
myWeakSet: '*WeakSet',  // new WeakSet in this.myWeakSet
Of course, instead of any of the given keywords, we could use any other value to initialize protected data, however in that case each capsule instance would have its protected data initialized with that particular value. For example:
myArray: [1, 2, 3]
would mean that each capsule instance would have myArray protected data object initialized with exactly the same array of three numbers.
Finally, let’s see the most general case to specify protected data. It looks similar to specifying parts. For each data, you provide a function to be called once for each capsule instance and also arguments for that function. The function could be called with or without new operator, depending on whether you specify it with the call or with the new keyword.
myObject: {
    call: function(arg){ // "call" or "new"
        return {name: arg}; // myObject becomes what is returned here
    },
    args: ... // (args / arguments / deferredArgs); the same as with parts
}
Having this in mind, let’s add a state machine to our application capsule as a protected data:
applicationLifecycle: {
    new: ApplicationLifecycle,
    args: 'this' // 'this' means application object as a constructor argument
}
As you already know, state machine instance requires an object to work with (an object whose lifecycle is to be managed by it). Hence, we use 'this' keyword to provide the state machine with the application object.
Once we have our state machine set up, we can use it in the usual way throughout methods of the application capsule:
this.applicationLifecycle.get().process('event_name');
Building User Interfaces
In addition to concepts explained above, Capsula exhibits concepts specifically dedicated to the domain of user interfaces. These concepts are developed to decouple managing hierarchy of widgets from managing any other behavior.
A capsule is not a widget per se. However, a capsule may represent a widget. What’s more, it may represent a group of widgets. The layout of this group of widgets may be fixed inside the capsule or left partly or completely unspecified. In other words, Capsula allows for combining mutually interacting widgets into a larger components (capsules) without necessarily gluing them together in terms of layout. This preserves reuse potential of capsules while increasing their complexity.
In the Capsula library, widget hierarchy is built by managing hierarchies of hooks and loops. Hook is a public property of capsule. It is a representation of parent widget in the parent-child relationship. Loop is also a public property of capsule. Unlike hook which represents parent widget, loop is a representation of child widget in the parent-child relationship. A capsule may have as many hooks and as many loops as necessary. Hence, a capsule may represent more than one parent widget and more than one child widget, all at the same time.
Capsula provides both object-oriented and template-based way of building user interfaces; the same concepts are used in both ways.
Object-Oriented Approach
To work with DOM elements in an object-oriented way, we’ve provided Element capsule in the html module. Basically, it’s a wrapper capsule for DOM elements and can be used either to wrap an existing DOM element or to create a new one (and wrap it).
Element capsule has one loop named loop. This loop represents wrapped DOM element as a child widget. In other words, this loop enables wrapped DOM element to be included on the page as a child of another DOM element.
Element capsule has one hook named hook. This hook represents wrapped DOM element as a parent widget. In other words, this hook enables wrapped DOM element to include other DOM elements inside itself as children.
Element capsule also has many public methods that enable us to work with wrapped element’s attributes, properties, CSS classes, inner HTML, etc.
| [class] Element | |
|---|---|
| Description | Wrapper capsule for DOM elements. Can be used either to wrap an existing DOM element or to create a new one (and wrap it). |
| Module | html |
To create new Element capsule as a wrapper of a new DOM element:
var div = new html.Element('div');
To create new Element capsule as a wrapper of an existing DOM element:
var div = new html.Element(document.getElementById('myDiv'));
To create a button and put it inside a div:
var button = new html.Element('button');
button.setInnerHTML('Open');
div.hook.add(button.loop); // puts button into div
The button.loop is a representation of our button in a child role. The div.hook is a representation of our div in a parent role. Instead of using capsules directly, here we use these two representations to create a DOM hierarchy. The reason for this is in the fact that in general case one capsule may represent more widgets (may have more than one hook or more than one loop, or both) and we have to specify which two widgets are going to form a parent-child relationship.
| [method] add | |
|---|---|
| Description | Ties this hook to the given hooks and loops. |
| Class | Hook |
But this is only in general case. In many other cases however, a capsule may represent only one widget in a child or a parent role. In such cases, the capsule itself may be used in creation of parent-child relationships. Element capsule is one such an example. It has only one hook and only one loop. So, it can appear either as a parent or as a child in statements that create widget hierarchy. In other words, the following line would be equivalent to the line given above:
div.add(button); // equivalent to div.hook.add(button.loop)
When a capsule has only one hook or loop it is safe to use it in an abbreviated statement like the one above. Depending on the statement’s context, capsule’s single hook or capsule’s single loop would be used. In our example, the div’s single hook and the button’s single loop are used to create a parent-child relationship.
| [method] add | |
|---|---|
| Description | Ties select hook or loop of this capsule (parent) to select hooks or loops of the given capsules (children). |
| Class | Capsule |
However, capsules may have more than one hook or loop. In such cases, we have to either a) use non-abbreviated statements (like div.hook.add(button.loop)) or b) modify or extend capsule classes in a way to provide implementation for methods that, depending on a context of usage, return hook or loop to be used in abbreviated statements. In other words, in a capsule class that has many hooks, we can override getDefaultParentHook method to return hook that would be used as a parent when capsule of that class is used in abbreviated statements. Similarly, in capsule class that has more than one loop, we override getDefaultChildLoop to return loop that would be used as a child in abbreviated statements.
| [method] getDefaultParentHook | |
|---|---|
| Description | Returns the default hook of this capsule, a hook that can act as a parent in the current context of execution. |
| Class | Capsule |
| [method] getDefaultChildLoop | |
|---|---|
| Description | Returns the default loop of this capsule, a loop that can act as a child in the current context of execution. |
| Class | Capsule |
In some cases a loop can act as a parent for other loops; similarly, a hook can sometimes act as a child to another hook. It makes sense to override additional two methods getDefaultParentLoop and getDefaultChildHook so that we can use the capsules in such cases as well. It would be explained later when these cases usually happen.
| [method] getDefaultParentLoop | |
|---|---|
| Description | Returns the default loop of this capsule, a loop that can act as a parent in the current context of execution. |
| Class | Capsule |
| [method] getDefaultChildHook | |
|---|---|
| Description | Returns the default hook of this capsule, a hook that can act as a child in the current context of execution. |
| Class | Capsule |
As show above, the Capsula library provides for the usual way of creating widget hierarchy by adding one widget to another. However, Capsula provides for the general case where a single capsule represents more widgets, both in parent and child roles. In the following lines you will learn when this becomes a real advantage.
Now, let’s add a bit of interaction to this example.
button.addEventOutput('click'); // let's listen for the click event

var dialog = new html.Element('dialog'); // create a dialog element (dialog HTML tag)
dialog.setInnerHTML('This is a dialog!');
div.add(dialog);

button.click.wire(function(){ // click handler
    dialog.setAttribute('open', ''); // opens it; attribute value not important
});
So now we have a div with two interacting widgets inside: a button and a dialog. Let’s try to encapsulate all this into a ShowInfo capsule. It should accept a dialog message as a constructor argument.
var ShowInfo = capsula.defCapsule({
    loops: 'root', // this is the loop that would represent inner div as a child
    init: function(message){
        var div = new html.Element('div'); // creates a part
        var button = new html.Element('button'); // creates a part
        var dialog = new html.Element('dialog'); // creates a part
        button.setInnerHTML('Open');
        button.addEventOutput('click');
        dialog.setInnerHTML(message);
        div.add(button); // i.e. div.hook.add(button.loop)
        div.add(dialog); // i.e. div.hook.add(dialog.loop)

        button.click.wire(this.clickHandler);

        // this is to represent div externally by the root loop
        this.root.add(div.loop); // or simply: this.add(div)

        this.dialog = dialog; // to be able to access dialog part in a clickHandler
    },
    clickHandler: function(){
        this.dialog.setAttribute('open', '');
    }
});

var info = new ShowInfo('Have a nice day.');
var body = new html.Element(document.body); // body wrapper
body.hook.add(info.root); // i.e. body.add(info);
Let’s now discuss what we have here. In the second line, we create the root loop for the ShowInfo capsule. This loop will later be used to place this capsule into its parent. Exactly that is done in the last line where we put our info instance into the page’s body. It remains to be answered what does the root loop represent from the interior of our ShowInfo capsule? That question is answered in the line this.root.add(div.loop); where we tie the root loop to the div’s loop. In other words, when the root loop gets tied to its parent, it basically refers to the div. In this case we see that the root loop acts as a parent to of the div’s loop. It may look a bit strange but instead of thinking of it as a parent, you can think of it in a different way, i.e.: the root loop is a sort of public counterpart of the internal loop (a sort of getter).
| [method] add | |
|---|---|
| Description | Ties this loop to the given loops. |
| Class | Loop |
Let’s once more get back to abbreviated way of creating widget hierarchy. In our ShowInfo example, we could use this.add(div) instead of this.root.add(div.loop). This is because there is no ambiguity: the ShowInfo capsule has only one loop that can act as a parent in statements that get executed inside its context (internally). Had the ShowInfo capsule had more than one loop, we would have been forced to provide an implementation of getDefaultParentLoop method to return a default parent loop in order to be able to use ShowInfo capsule internally in abbreviated statements as a parent.
Similarly, looked from the outside, had the ShowInfo capsule had more than one loop, we would have been forced to provide an implementation of getDefaultChildLoop method to return a default child loop in order to be able to use ShowInfo capsule externally in abbreviated statements as a child. (By the way, there’s no problem in having default child loop and default parent loop being the same loop.)
Instead of using declarative we could use imperative way to create the root loop. So, instead of the line loops: 'root', we could add this line to the constructor:
this.root = new capsula.Loop();
Everything else stays the same.
The similar logic holds for hooks. When used externally a capsule may provide a hook acting as a parent. Internally however, a capsule may provide hook acting as a child only. It is basically an inverted logic than the one behind loops.
Let’s continue with our example and explain a few more details. The dialog part had to be given a non-local reference in this.dialog = dialog; line in order to be able to use it in other methods of the ShowInfo capsule, like in clickHandler. Dynamically created parts, such as our div, button, and dialog, are equivalent to declaratively created ones; the only difference is in the fact that they don’t get explicitly referenced (from this), unless you do it yourself.
Final remark. In cases when we need to directly couple the world of capsules to the world of DOM elements, like in the last two lines of the example above, we can use the renderInto (shortcut) method:
info.root.renderInto(document.body); // instead of the last two lines
| [method] renderInto | |
|---|---|
| Description | Renders this loop (i.e. the DOM element this loop represents) into the given DOM element. |
| Class | Loop |
Now, let’s see how to implement the same capsule in a more declarative way:
var ShowInfo = capsula.defCapsule({
    loops: 'root',
    div: {
        capsule: html.Element,
        args: 'div'
    },
    button: {
        capsule: html.Element,
        args: ['button', ['click']] // reacts on click event
    },
    dialog: {
        capsule: html.Element,
        args: 'dialog'
    },
    init: function(message){
        this.button.setInnerHTML('Open');
        this.dialog.setInnerHTML(message);
    },
    'div.hook': ['button.loop', 'dialog.loop'],
    'this.root': 'div.loop',
    'button.click': 'this.clickHandler', // pay attention to ! sign (see bellow)
    clickHandler: function(){
        this.dialog.setAttribute('open', null);
    }
});

var info = new ShowInfo('Have a nice day.');
info.root.renderInto(document.body);
As show above, creating parts, tying hooks and loops, and wiring operations (and methods in this case) can all be done in a declarative way.
Also note that making the button listen to click events could be done during construction either as shown above where args property contains additional array of events, or in case of imperative construction like this:
var button = new html.Element('button', ['click']); // more events could be added
Whether being a fan of imperative or declarative style, at this point you have the ShowInfo capsule encapsulating two interacting widgets. However, our capsule specifies not only how the two widgets interact, but also how they are positioned in terms of layout (both are placed inside a container div):
<div>
    <button>Open</button>
    <dialog open="null">Have a nice day.</dialog>
</div>
Sometimes that may be a bit inflexible. What if we want to encapsulate these two interacting widgets without specifying how they are positioned? Are we able to encapsulate our dialog, button, and interaction between them, without placing them under a common container or one next to another? In Capsula, yes. We no longer need the div part, since we are not going to render button and dialog inside it. We are going to leave the layout decisions outside the ShowInfo capsule.
var ShowInfo = capsula.defCapsule({
    loops: ['buttonLoop', 'dialogLoop'], // two loops: one for button, one for dialog
    button: {
        capsule: html.Element,
        args: ['button', ['click']]
    },
    dialog: {
        capsule: html.Element,
        args: 'dialog'
    },
    init: function(message){
        this.button.setInnerHTML('Open');
        this.dialog.setInnerHTML(message);
    },
    'this.buttonLoop': 'button.loop', // tying the button to the buttonLoop
    'this.dialogLoop': 'dialog.loop', // tying the dialog to the dialogLoop
    'button.click': 'this.clickHandler',
    clickHandler: function(){
        this.dialog.setAttribute('open', null);
    }
});

var info = new ShowInfo('Have a nice day.');

// now, let the user of info capsule decide where to put the button and the dialog
info.dialogLoop.renderInto(document.getElementById('div1'));
info.buttonLoop.renderInto(document.getElementById('div2'));
Now we have our ShowInfo capsule much more flexible, since it only encapsulates structure and interaction, while the layout of its parts is left for someone else to specify. This is the core idea behind the mechanism of hooks and loops. So, in this case we get:
<div id="div1">
    <dialog open="null">Have a nice day.</dialog>
</div>
...
<div id="div2">
    <button>Open</button>
</div>
The dialog and the button are interacting as usual and this is nicely encapsulated into a single capsule. However, they are no longer fixed in terms of layout i.e. they can be placed anywhere on the screen independently of one another.
The mechanism of hooks and loops enables us to decide which layout decisions we want to make inside a capsule and which to leave out of it. This enables us to increase complexity of capsules (by encapsulating ever more parts inside) while preserving the capsule’s potential to be reused (since parts are not bound to one another in terms of layout). In user interface development most of inflexibility comes from fixing the layout of your components in advance.
Working with Templates
We’ve provided the Template capsule in the html module to allow for building portions of user interface using templates.
Template capsule provides means to easily reuse portions of HTML code and enrich them with a bit of behavior. It introduces HTML-based templates to the capsules code. By doing so, it provides a coupling between capsules and HTML code and allows for making a perfect mix of template-based and object-oriented code, i.e. for having the benefits of both worlds.
Template capsule helps in situations when creating a portion of user interface is easier using templates over object-orientation. Still, the template capsule preserves semantics of capsules and acts as any other capsule with input and output operations, hooks, and loops which makes it easy to combine with other capsules. In other words, the world of templates and the world of capsules are perfectly compatible and semantically coupled.
| [class] Template | |
|---|---|
| Description | Template capsule provides means to easily reuse portions of HTML code and enrich them with a bit of behavior. |
| Module | html |
Template capsule is easily instantiated from the portion of HTML code:
var template = new html.Template(`...HTML code here...`);
There are several things here that should be remembered.
Firstly, the HTML code of your template may have many root tags (elements), i.e. there is no requirement for template to be rooted in a single HTML tag. Each of the root HTML tags must have a loop attribute with a unique non-empty value. This is because a loop is created in a template capsule for each of them. Later we can use these loops to place our root tags somewhere on the page. Each loop would get its name from the value specified in the loop attribute of the corresponding tag.
Secondly, apart from loop attributes, the HTML code used for instantiating template capsule may have other attribute-based extensions, i.e. attributes for hooks and operations. All this is a) to enable template sections (root tags) to be included somewhere on the HTML page, b) to enable template to include other HTML content under its tags, and c) to enrich the template with a bit of behavior. According to these attributes, template capsule dynamically creates hooks, loops, and operations during instantiation.
Finally, we usually use template literals (backticks) to surround template strings; this helps easily distinguish templates from other strings in your code (but be careful, IE doesn’t support them yet).
The following attributes of HTML elements (tags) inside the template are supported:
- attribute loop - HTML element (tag) having
loop="myLoop"attribute would be represented by a loop namedmyLoopof the template capsule. For example, HTML code<div loop="myLoop">...</div>would make template capsule have loop namedmyLoopthat represents the div element as a child. Element having loop attribute must be one of the root elements in the template code. Moreover, root elements must haveloopattribute in order to be displayed on the page. Since HTML code of template capsule may have more than one root element, consequently the template capsule may have more than one loop.
var caps = ...; // this is an arbitrary capsule having hook named myHook

// creates template capsule with a loop named loopX
var template = new html.Template(`
    <div id="abc" loop='loopX'>
        <h1>Hello world!</h1>
    </div>
`);

caps.myHook.tie(template.loopX); // places the div with id="abc" into its new parent
- attribute hook - HTML element (tag) having
hook="myHook"attribute would be represented as a parent by a hook namedmyHookof the template capsule. Any element (tag) of the HTML template code may have the hook attribute. Usually however, the leaf elements of the template code have it, as they expect to be filled with new HTML content when their hooks get tied.
var caps1 = ...; // this is an arbitrary capsule having hook named myHook
var caps2 = ...; // this is an arbitrary capsule having loop named myLoop

// creates template capsule with a loop named loopX and a hook named hookX
var template = new html.Template(`
    <div loop='loopX'>
        <h1>Hello world!</h1>
        <div id="abc" hook="hookX"></div>
    </div>
`);

caps1.myHook.tie(template.loopX); // places the whole template into its new parent

// places an arbitrary content (represented by caps2.myLoop)
// into the template's hook (i.e. into the div with id="abc")
template.hookX.tie(caps2.myLoop);
- attribute prop - HTML element (tag) having
prop="setProp"attribute would act as a target forsetPropinput operation of the template capsule. The operation sets new property value for the given property of the target element. The operation has two string arguments: the property name and the property value to be set. - attribute getprop - HTML element (tag) having
getprop="getProp"attribute would act as a target forgetPropinput operation of the template capsule. The operation returns the property value of the target element. The operation has one string argument: the property name whose value is to be returned.
// creates template capsule with input operations to get and set h1's properties
var template = new html.Template(`
    <div loop='loopX'>
        <h1 prop='setH1Prop' getprop='getH1Prop'>Hello world!</h1>
    </div>
`);
if (template.getH1Prop('dir') === 'rtl') // checks the property value
    template.setH1Prop('dir', 'ltr'); // sets the property value
- attribute attr - HTML element (tag) having
attr="setAttr"attribute would act as a target forsetAttrinput operation of the template capsule. The operation sets new attribute value for the given attribute of the target element. The operation has two string arguments: the attribute name and the attribute value to be set. - attribute getattr - HTML element (tag) having
getattr="getAttr"attribute would act as a target forgetAttrinput operation of the template capsule. The operation returns the attribute value of the target element. The operation has one string argument: the attribute name whose value is to be read. - attribute remattr - HTML element having
remattr="removeAttr"attribute would act as a target forremoveAttrinput operation of the template capsule. The operation removes the attribute from the target element. The operation has one string argument: the attribute name to be removed.
// creates template capsule with input operations to handle attributes
var template = new html.Template(`
    <div loop='loopX'>
        <input type='text' attr='setInputAttr' getattr='getInputAttr' remattr='removeInputAttr'>
    </div>
`);
if (template.getInputAttr('disabled')) // checks the attribute value
    template.removeInputAttr('disabled'); // removes the attribute
else
    template.setInputAttr('disabled', false); // sets the attribute value
- attributes on and output - HTML element having
on="click"andoutput="clicked"attributes would have click event listener bound to theclickedoutput operation of the template capsule. The event object itself would be provided as a parameter to the output operation.
// creates template capsule with output operation to signal the 'click' event
var template = new html.Template(`
    <div loop='loopX'>
        <button on="click" output="clicked"></button>
    </div>
`);

template.clicked.wire(function(e){
    alert('Button ' + e.type + 'ed!'); // alerts 'Button clicked!'
});
- attribute get - HTML element having
get="getMe"attribute would act as a subject forgetMeinput operation of the template capsule. The operation simply returns the subject (DOM) element.
// creates template capsule with input operation that returns the label element
var template = new html.Template(`
    <div loop='loopX'>
        <label get="getLabel">First name:</label>
    </div>
`);
alert(template.getLabel().innerText); // alerts 'First name:'
As a final example, we demonstrate how to create template capsule that has more than one root element.
// an arbitrary capsules having hooks named myHook and hk, respectively
var caps1 = ..., caps2 = ...;

// creates template capsule with loops named loopX and loopY
var template = new html.Template(`
    <div id="abc" loop='loopX'>
        <h1>Hello world!</h1>
    </div>
    <div id="cba" loop='loopY'>
        <h1>Hello world again!</h1>
    </div>
`);

// places the template's div with id="abc" into its new parent
caps1.myHook.tie(template.loopX);

// places the template's div with id="cba" into its new parent
caps2.hk.tie(template.loopY);
Asynchronous RPC Communication
It is quite usual for applications to have components that perform remote procedure calls (RPC), i.e. communication based on the client-server (request-response) paradigm. This is especially true when building user interfaces.
The key concept that handles this is service: a named facade that simplifies clients’ code and handles communication. It handles all RPC asynchronously.
Each service is of a certain type. A service type depends on the type of the server or the type of channel used in communication, or both. Server can be an HTTP server, a Capsule, a JavaScript function, or anything else able to handle clients’ requests. Whatever the server is, the clients’ code looks the same which is great because you can easily alter server side without ever affecting clients.
It is quite possible and very easy to create custom service types as will be shown later. But let’s go one step at a time.
Performing AJAX Calls
Let’s demonstrate using services on AJAX service type.
To use service you must first register it. This is one-time operation and means configuring service plus assigning it to an arbitrary name for later reference. Configuring service assumes selecting service type to use plus setting parameters specific to that service type. For example, to set up an AJAX service one has to select AJAX service type plus additional parameters like URL, HTTP method, etc.:
services.register('myService', { // registration of service 'myService'
    type: html.ServiceType.AJAX, // the type of service
    url: 'services/service-x',
    method: 'post',
    headers: {
        'Cache-Control' : 'no-cache'
    },
    beforeSend: function(xHttpReq){
        xHttpReq.setRequestHeader('Keep-Alive', '300');
    }
});
After service registration you can use it from anywhere in your code by just specifying its name (myService in this case). In other words, there is no need (nor is it possible) to keep a service reference. Just remember its name.
Clients that use service are unaware of type of service that they use. They can focus only on what’s essential for them and that is to send their requests and receive responses. So, no matter what the service type is the client code looks the same:
services.send('myService', { /*...the request goes here... */ })
.then(function(response){
    alert('success');
}, function(error){
    alert('error');
});
The send function returns Promise object which you know how to use, right?
Now, you can imagine how to change service type (and/or service parameters) without affecting clients’ code: just modify service configuration object provided to the services.register method. And yes, don’t tell that to the clients.
It is very important to note here that send method does not immediately send the given request over the “wire” to the server. It only puts it into a dedicated buffer. Then, another client may send its own request to the same service; it ends up in the same buffer as well. Finally, when the buffer is flushed, all requests go along to the server within the same physical request:
services.flush('myService');
This may seem like a bit of an overhead, but in fact it brings one key advantage: the logical communication between clients and the server is decoupled from the physical. You can have multiple clients logically communicating with the server as if they were alone. At the same time physical communication can be tuned to fit anywhere between the following two edge cases (inclusive): 1) all logical requests in a single physical request and 2) each logical request in its own physical request.
Again, the clients need to know neither the service type used in communication nor if other clients are participating in the communication or not.
This has one very important consequence. Clients or client components (capsules) are now able to take over their part of communication from a communication agent that would otherwise exist in order to orchestrate all client components’ communication with the server. This makes client components more powerful and yet independent and reusable while the agent existence is no longer necessary.
Other Types Of RPC
Apart from AJAX service type, Capsula provides a few more. And yes, you can create your own easily (check the next chapter). The following service types are provided in html module:
- html.ServiceType.AJAX - AJAX communication with HTTP server using request body
- html.ServiceType.AJAX_URL_ENCODED - AJAX communication with HTTP server using URL (query parameters) only
- html.ServiceType.AJAX_JQUERY - AJAX communication with HTTP server over jQuery
Services module provides three of its own types:
- services.ServiceType.FUNCTION - communication with simple JavaScript function acting as a server (good for mocking server in the early stage of development)
- services.ServiceType.ASYNC_FUNCTION - communication with a JavaScript function that returns results as a Promise
Finally, capsula module provides its own service type for operations:
- capsula.ServiceType.OPERATION - communication with an operation acting as a server
Remember, whatever the service type you choose to use, the client code remains the same.
Creating Custom RPC Types
When neither one of the provided service types is suitable for your async RPC, a new service type could easily be created by calling registerType function of the services module:
services.registerType('myType', function (requests, serviceConfig, serviceName) {
    // ...
});
The first parameter is a the new service type’s name. This is what should be provided in the type property of service configuration object when creating service of this newly created type. For example:
services.register('myService', { // registration of service 'myService'
    type: 'myType', // must match existing service type's name
    // ...
});
The second parameter of registerType function is a function that actually handles physical transfer of clients requests to the server (whatever the server is). This function has three parameters:
The first (requests) argument would be an array of objects each of which contains the client’s request in its body property and resolve and reject functions in its resolve and reject properties. Like this:
{
    body: { /* this is what the client has sent by calling the send function */ },
    resolve: resolve, // the function to call in case of success
    reject: reject // the function to call in case of failure
}
The second argument (serviceConfig) would be the configuration object of the particular service (the second argument of the register function). In other words, the service configuration object provided when service is being registered would appear here when it comes to sending requests over that service.
The third argument (serviceName) would be the name of the particular service (the first argument of the register function). In other words, the service name provided when service is being registered would appear here when it comes to sending requests over that service.
Now that we know all the parameters of this function, we can approach its implementation to create new service type. The function should perform all necessary actions in order to send requests to their destination and receive and handle responses. More precisely, it needs to pack all clients’ requests into a single physical request, send that physical request to its destination, wait for the physical response, unpack the physical response into individual responses, and handle each individual response (by calling the corresponding request’s resolve or reject function).
For example, the complete implementation of service type that handles communication with a simple JavaScript function could look like this:
services.registerType('myType', function (requests, serviceConfig, serviceName) {
    // packing
    var packed = []; // let's pack requests into an array
    for (var i = 0; i < requests.length; i++)
        packed.push(requests[i].body); // we take the client's request from the body

    // sending
    // Let's assume the target function is provided
    // in the func property of the serviceConfig object
    var responses = serviceConfig.func(packed);

    // unpacking & handling
    for (var i = 0; i < responses.length; i++){
        var request = requests[i],
        response = responses[i];
        // let's assume successfully handled request has
        // success property set to true in the response
        if (response != null && response.success)
            request.resolve(response); // call the Promise's resolve function
        else
            request.reject(response.error); // call the Promise's reject function
    }
});
Now we can create service of the newly created type and use it to send requests over to the target function that acts like a server:
services.register('myService', {
    type: 'myType',
    func: function(requestsArr){
        var responses = [];
        // TODO handle requests and prepare responses
        return responses;
    }
});

services.send('myService', { /* my request */ }).then(function(response){
    // process the response
});

services.flush('myService');